FTP Server Behind pfSense
Setting up a FTP server behind a pfSense firewall to allow remote backups and uploads.
Install
My server is virtual but can be a dedicated server just the same for this. I made a fresh install of Debian 8 and installed Proftpd on it. During the install you are asked to do an inet.d or standalone install. I am using standalone:
sudo apt install proftpd
Then make a new user without shell access (so they can’t login over SSH) and with the home directory of /var/www. Set the password to whatever you want:
sudo adduser ftpaccessuser -shell /bin/false -home /var/www
Make a new group called “ftpuser”
sudo addgroup ftpuser
Add the new user to the group called “ftpuser”
sudo adduser ftpaccessuser ftpuser
Reload the proftpd server:
sudo /etc/init.d/proftpd reload
And start the server:
sudo /etc/init.d/proftpd start
Editing proftpd.conf
Edit the configuration file for proftpd:
sudo nano /etc/proftpd/proftpd.conf
Below is my complete proftpd.conf with the changed and added lines highlighted. Most of the edits are thanks to Thomas Krenn with some small changes for my own setup:
- IPv6 is turned off
- Port 21 is changed to 4101 to avoid scanners and I didn’t find any services using it
- The passive port range is only set to 60,000-60,050 since I have very few clients connecting at once (you may need to increase this if you have more clients connecting at once)
- The masquerade address is set to my dynamic IP
- DynMasqRefresh is uncommented to update every 8 hours
The additions at the bottom are directly from Thomas Krenn and make it so:
- The users don’t need a valid shell (the user was made without shell access)
- They are kept in their root directory
- No one can login if they aren’t in the ftpuser group
#
# /etc/proftpd/proftpd.conf -- This is a basic ProFTPD configuration file.
# To really apply changes, reload proftpd after modifications, if
# it runs in daemon mode. It is not required in inetd/xinetd mode.
#

# Includes DSO modules
Include /etc/proftpd/modules.conf

# Set off to disable IPv6 support which is annoying on IPv4 only boxes.
UseIPv6                         off
# If set on you can experience a longer connection delay in many cases.
IdentLookups                    off

ServerName                      "Debian"
ServerType                      standalone
DeferWelcome                    off

MultilineRFC2228                on
DefaultServer                   on
ShowSymlinks                    on

TimeoutNoTransfer               600
TimeoutStalled                  600
TimeoutIdle                     1200

DisplayLogin                    welcome.msg
DisplayChdir                    .message true
ListOptions                     "-l"

DenyFilter                      \*.*/

# Use this to jail all users in their homes
# DefaultRoot                   ~

# Users require a valid shell listed in /etc/shells to login.
# Use this directive to release that constrain.
# RequireValidShell             off

# Port 21 is the standard FTP port.
Port                            4101

# In some cases you have to specify passive ports range to by-pass
# firewall limitations. Ephemeral ports can be used for that, but
# feel free to use a more narrow range.
PassivePorts                  60000 60050

# If your host was NATted, this option is useful in order to
# allow passive tranfers to work. You have to use your public
# address and opening the passive ports used on your firewall as well.
MasqueradeAddress             yourdynamic.ip.address

# This is useful for masquerading address with dynamic IPs:
# refresh any configured MasqueradeAddress directives every 8 hours
<IfModule mod_dynmasq.c>
DynMasqRefresh 28800
</IfModule>

# To prevent DoS attacks, set the maximum number of child processes
# to 30.  If you need to allow more than 30 concurrent connections
# at once, simply increase this value.  Note that this ONLY works
# in standalone mode, in inetd mode you should use an inetd server
# that allows you to limit maximum number of processes per service
# (such as xinetd)
MaxInstances                    30

# Set the user and group that the server normally runs at.
User                            proftpd
Group                           nogroup

# Umask 022 is a good standard umask to prevent new files and dirs
# (second parm) from being group and world writable.
Umask                           022  022
# Normally, we want files to be overwriteable.
AllowOverwrite                  on

# Uncomment this if you are using NIS or LDAP via NSS to retrieve passwords:
# PersistentPasswd              off

# This is required to use both PAM-based authentication and local passwords
# AuthOrder                     mod_auth_pam.c* mod_auth_unix.c

# Be warned: use of this directive impacts CPU average load!
# Uncomment this if you like to see progress and transfer rate with ftpwho
# in downloads. That is not needed for uploads rates.
#
# UseSendFile                   off

TransferLog /var/log/proftpd/xferlog
SystemLog   /var/log/proftpd/proftpd.log

# Logging onto /var/log/lastlog is enabled but set to off by default
#UseLastlog on

# In order to keep log file dates consistent after chroot, use timezone info
# from /etc/localtime.  If this is not set, and proftpd is configured to
# chroot (e.g. DefaultRoot or <Anonymous>), it will use the non-daylight
# savings timezone regardless of whether DST is in effect.
#SetEnv TZ :/etc/localtime

<IfModule mod_quotatab.c>
QuotaEngine off
</IfModule>

<IfModule mod_ratio.c>
Ratios off
</IfModule>

# Delay engine reduces impact of the so-called Timing Attack described in
# http://www.securityfocus.com/bid/11430/discuss
# It is on by default.
<IfModule mod_delay.c>
DelayEngine on
</IfModule>

<IfModule mod_ctrls.c>
ControlsEngine        off
ControlsMaxClients    2
ControlsLog           /var/log/proftpd/controls.log
ControlsInterval      5
ControlsSocket        /var/run/proftpd/proftpd.sock
</IfModule>

<IfModule mod_ctrls_admin.c>
AdminControlsEngine off
</IfModule>

#
# Alternative authentication frameworks
#
#Include /etc/proftpd/ldap.conf
#Include /etc/proftpd/sql.conf

#
# This is used for FTPS connections
#
#Include /etc/proftpd/tls.conf

#
# Useful to keep VirtualHost/VirtualRoot directives separated
#
#Include /etc/proftpd/virtuals.conf

# A basic anonymous configuration, no upload directories.

# <Anonymous ~ftp>
#   User                                ftp
#   Group                               nogroup
#   # We want clients to be able to login with "anonymous" as well as "ftp"
#   UserAlias                   anonymous ftp
#   # Cosmetic changes, all files belongs to ftp user
#   DirFakeUser on ftp
#   DirFakeGroup on ftp
#
#   RequireValidShell           off
#
#   # Limit the maximum number of anonymous logins
#   MaxClients                  10
#
#   # We want 'welcome.msg' displayed at login, and '.message' displayed
#   # in each newly chdired directory.
#   DisplayLogin                        welcome.msg
#   DisplayChdir                .message
#
#   # Limit WRITE everywhere in the anonymous chroot
#   <Directory *>
#     <Limit WRITE>
#       DenyAll
#     </Limit>
#   </Directory>
#
#   # Uncomment this if you're brave.
#   # <Directory incoming>
#   #   # Umask 022 is a good standard umask to prevent new files and dirs
#   #   # (second parm) from being group and world writable.
#   #   Umask                           022  022
#   #            <Limit READ WRITE>
#   #            DenyAll
#   #            </Limit>
#   #            <Limit STOR>
#   #            AllowAll
#   #            </Limit>
#   # </Directory>
#
# </Anonymous>

# Include other custom configuration files
Include /etc/proftpd/conf.d/

<Global>
    RequireValidShell off
</Global>

DefaultRoot ~ ftpuser

<Limit LOGIN>
    DenyGroup !ftpuser
</Limit>
Restart the server to make the changes stick:
sudo /etc/init.d/proftpd restart
If you get any errors, go ahead and fix them now. The nice thing is that proftpd usually tells you what line of the conf file it had problems with, making fixing them straightforward.
Changing pfSense Firewall Rules For FTP Traffic
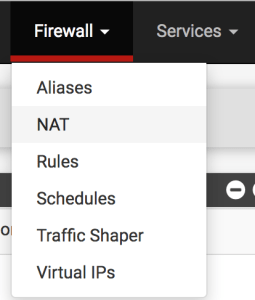
Login into pfSense and click Firewall -> NAT at the top:

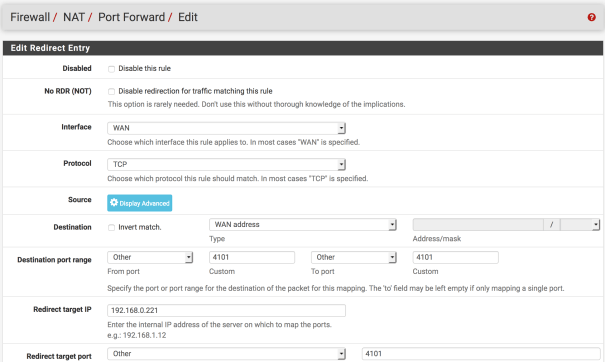
Click Add to create a new rule:
![]()
Use the following with changes for your own setup:
Interface: WAN
Protocol: TCP
Destination: WAN address
Destination port range: Other 4101 to Other 4101
Redirect target IP: The server’s internal IP

Redirect target port: Other 4101
Description: FTP port forward for 4101
Filter rule association: Create new associated filter rule
Click Save and Apply Changes on the next page.

For the passive port range redirect it is almost the same. Create a new rule with:
Interface: WAN
Protocol: TCP
Destination: WAN address
Destination port range: Other 60000 to Other 60050
Redirect target IP: The server’s internal IP

Redirect target port: Other 60000
Description: FTP passive port forward
Filter rule association: Create new associated filter rule

Click Save and Apply Changes on the next page.
Testing the Server
Open FileZilla and at the top of the window fill in the server external address (what you put in for ), username, password, and port, and press Quickconnect:
If it is successful you should see this in the status box below:
Remember these settings and you should be able to connect a remote server to do backups and uploads!
Sources
Thomas Krenn’s blog with most of the instructions I followed:
https://www.thomas-krenn.com/en/wiki/Setup_FTP_Server_under_Debian
Some advice on how many ports to leave open for passive FTP:
https://community.spiceworks.com/topic/264383-how-many-ftp-passive-ports-to-leave-open-on-firewall
Two pfSense articles on setting up a FTP server behind the firewall and passing ports to it:
https://doc.pfsense.org/index.php/FTP_without_a_Proxy
https://doc.pfsense.org/index.php/Howto_setup_ftp_server_behind_pfsense
Using FileZilla to connect to your server:
http://www.moh10ly.com/blog/file-sharing-server


Leave a Reply