Rustic Dining Room Table, Version 1
A friend texted one night if I had a saw that could cut 45 angles and if I could help him make a new table for his wife in their new home. I offered to help and we went to the local big box home improvement store and bought some Douglas Fir lumber. They were looking for a table that fit their decor, wasn’t too expensive, and looked good to them. I think we pretty much nailed it!
After completing this and during the writeup, I realized that this was probably based on the design by Shanty 2 Chic and that their’s was based on a design by Ana White.

Lumber Choice and Wood Shrinkage
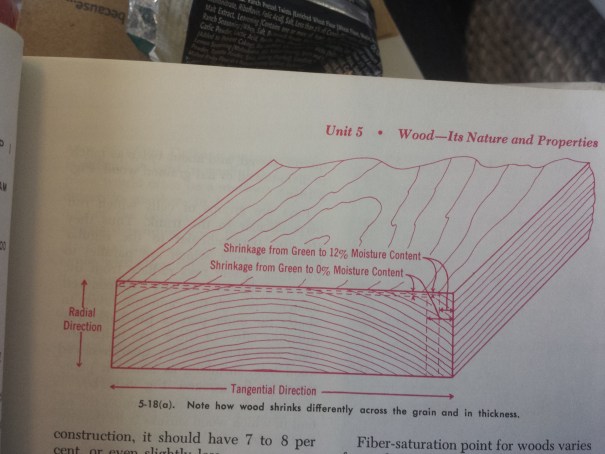
I explained to him a little about how the wood was wet and will likely contract and move as it dries, and that we will need to pick lumber that is very straight, and if possible only has straight grain and avoid the pith (center of the tree that is very sappy and soft). We spent an hour picking out our pieces, grabbed some Taco Bell, and got to cutting.

Wood List
We picked up:
2 – 4x4x8 for the horizontal supports – $18
4 – 2x10x8 for the table top – $38
6 – 2x4x8 for the rest of the build – $18
The plans he had also called for a 1x4x12, but we ripped a 2×4 down the middle so all the wood would match. All we could find in 1x dimensions were pine and I wasn’t sure if the stain would match at the end.
Legs
The legs are beefy! Two 20″ long 2x4s that are and glued and screwed together form the center of the leg on each side. This gets capped by a 1×4 on both ends, supported by 2x4s at 45 angles, and finished with a 4×4 on both the top and bottom. The original plans called for all 2x4s and I changed it to 4x4s to give it a more blocky appearance.


Stretchers
The two sides are only connected with a single 2×4 across the top and a second across the bottom. Then there are two vertical supports running from the bottom middle, to the top corners. This provides plenty of bracing to prevent the table from racking across its length. The table top will also provide some more stability with its weight and how it’s attached to the ends.


Base Frame Finish
My friend wanted to paint the base and used BEHR Weatherproofing All-In-One Wood Stain and Sealer to do it. It’s meant for outdoor decks and should be helpful in resisting wear and tear.
He sanded the whole thing down with 120-grit sandpaper to get the rough burrs off and then did two coats.


Top
The top is very simple. It is just 4 2x10x8s pocket screwed from underneath to the ends. As you can see in the photo below, although the wood was carefully picked for straightness and grain, it still warped and moved. It even moved so much, he ended up replacing one of them.
For the finish, he used the same white finish as on the base. Then he applied a coat of Minwax Poly Shades, and wiped it off after a few minutes. This gives it a semi-stained appearance that might be mistaken for an antique.


Leave a Reply